工具栏是一行命令,它通常位于标准窗体应用程序主菜单的正下方。事实上,这可能是一个简单的有按钮的面板。通过使用WPF工具栏控件,您可以获得一些额外的好处,如自动溢出处理以及由最终用户重新定位工具栏。
WPF工具栏通常放在工具栏托盘控件内。 工具栏托盘可以处理诸如放置和大小调整等类似功能,并且您可以在工具栏托盘元素内部放置多个工具栏控件。 接下来让我们看一个非常基本的例子:
<Window x:Class="WpfTutorialSamples.Common_interface_controls.ToolbarSample"
        xmlns="http://schemas.microsoft.com/winfx/2006/xaml/presentation"
        xmlns:x="http://schemas.microsoft.com/winfx/2006/xaml"
        Title="ToolbarSample" Height="200" Width="300">
    <Window.CommandBindings>
        <CommandBinding Command="New" CanExecute="CommonCommandBinding_CanExecute" />
        <CommandBinding Command="Open" CanExecute="CommonCommandBinding_CanExecute" />
        <CommandBinding Command="Save" CanExecute="CommonCommandBinding_CanExecute" />
    </Window.CommandBindings>
    <DockPanel>
        <ToolBarTray DockPanel.Dock="Top">
            <ToolBar>
                <Button Command="New" Content="New" />
                <Button Command="Open" Content="Open" />
                <Button Command="Save" Content="Save" />
            </ToolBar>
            <ToolBar>
                <Button Command="Cut" Content="Cut" />
                <Button Command="Copy" Content="Copy" />
                <Button Command="Paste" Content="Paste" />
            </ToolBar>
        </ToolBarTray>
        <TextBox AcceptsReturn="True" />
    </DockPanel>
</Window>
using System;
using System.Windows;
using System.Windows.Input;
namespace WpfTutorialSamples.Common_interface_controls
{
public partial class ToolbarSample : Window
{
public ToolbarSample()
{
InitializeComponent();
}
private void CommonCommandBinding_CanExecute(object sender, CanExecuteRoutedEventArgs e)
{
e.CanExecute = true;
}
}
}
请注意在这里我是如何对所有按钮使用命令的。我们在前一章中对此进行了讨论,使用命令肯定会给我们带来一些好处。 有关详细信息,请查看“菜单”一章或有关命令的文档。
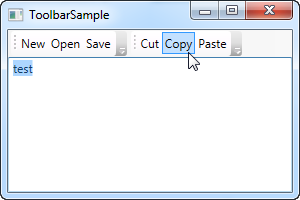
在这个例子中,我将一个工具栏托盘添加到屏幕顶部,并在其中添加两个工具栏控件。 每个工具栏控件都包含一些按钮,我们使用命令来给他们定义行为。在后台代码中,需要确保处理前三个按钮的CanExecute事件,因为WPF不会自动实现它。这与剪切,复制和粘贴命令不同。剪切,复制和粘贴命令可以很好地由WPF处理的。
试着运行该示例。如果你将光标放在其中一个工具栏(虚线区域)的左侧部分上,单击并按住鼠标左键,你就可以重新定位工具栏,例如,使这个工具栏低于另一个甚至使它们互换位置。
虽然在工具栏按钮上可以使用文本,但通常的方法是使用图标或至少图标和文本的组合。因为WPF使用常规的按钮控件,因此给工具栏项添加图标非常容易。 看看下一个例子,该示例展示了这两种表示按钮的方式:
<Window x:Class="WpfTutorialSamples.Common_interface_controls.ToolbarIconSample"
        xmlns="http://schemas.microsoft.com/winfx/2006/xaml/presentation"
        xmlns:x="http://schemas.microsoft.com/winfx/2006/xaml"
        Title="ToolbarIconSample" Height="200" Width="300">
    <DockPanel>
        <ToolBarTray DockPanel.Dock="Top">
            <ToolBar>
                <Button Command="Cut" ToolTip="Cut selection to Windows Clipboard.">
                    <Image Source="/WpfTutorialSamples;component/Images/cut.png" />
                </Button>
                <Button Command="Copy" ToolTip="Copy selection to Windows Clipboard.">
                    <Image Source="/WpfTutorialSamples;component/Images/copy.png" />
                </Button>
                <Button Command="Paste" ToolTip="Paste from Windows Clipboard.">
                    <StackPanel Orientation="Horizontal">
                        <Image Source="/WpfTutorialSamples;component/Images/paste.png" />
                        <TextBlock Margin="3,0,0,0">Paste</TextBlock>
                    </StackPanel>
                </Button>
            </ToolBar>
        </ToolBarTray>
        <TextBox AcceptsReturn="True" />
    </DockPanel>
</Window>前两个按钮通过将内容指定为图像控件,它们将基于图标而不是基于文本了。 第三个按钮,我把图像控件和文本控件组合在一个面板控件中,以实现在按钮上同时显示图标和文本。这个方式对于非常重要的按钮以及一些用不明显图标的按钮是非常常用的。
请注意我是如何在每个按钮上使用 提示属性来添加说明文字的。 这对那些仅有一个图标的按钮来说尤其重要,因为仅通过查看图标可能无法明白按钮的用途。 使用提示属性,用户可以通过将鼠标悬停在按钮上以获取其功能的描述,如屏幕截图所示。
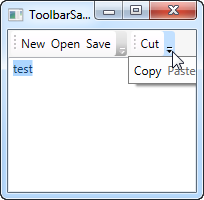
就如先前提到的,使用工具栏控件而不是用一个带按钮的面板的一个很好理由就是自动溢出处理。 这意味着如果没有足够的空间显示工具栏上的所有按钮,WPF会将它们放入一个菜单,该菜单能通过单击工具栏右侧的箭头来访问。您可以由此屏幕截图中看到自动溢出处理是如何工作的。该屏幕截图显示了第一个示例,当窗口较小而仅给工具栏留下了较少空间的情况:

WPF甚至允许您决定哪些项目可以溢出隐藏,哪些项目应始终可见。 通常,在设计工具栏时,有些项目不如其他项目重要,有些项目甚至可能一直想要在溢出菜单中,无论是否有足够的空间。
这是附加属性ToolBar.OverflowMode发挥作用的地方。 默认值为IfNeeded,这意味着如果没有足够的空间,工具栏项将放在溢出菜单中。 您可以使用始终或从不来替代默认值,这两个值的作用就如名称所暗示的:始终将项目放在溢出菜单中或阻止项目移动到溢出菜单。 以下是一个展示如何使用此属性的示例:
<ToolBar>
    <Button Command="Cut" Content="Cut" ToolBar.OverflowMode="Always" />
    <Button Command="Copy" Content="Copy" ToolBar.OverflowMode="AsNeeded" />
    <Button Command="Paste" Content="Paste" ToolBar.OverflowMode="Never" />
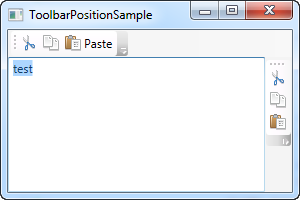
</ToolBar>虽然工具栏的最常见位置位于屏幕顶部,但工具栏也可以位于应用程序窗口的底部,甚至可以在两侧。 WPF工具栏支持所有这些功能。工具栏置地就是简单地将工具栏与面板底部对接,而不是顶部。垂直工具栏需要使用工具栏托盘的Orientation属性。 接下来请让我用一个示例展示说明:
<Window x:Class="WpfTutorialSamples.Common_interface_controls.ToolbarPositionSample"
        xmlns="http://schemas.microsoft.com/winfx/2006/xaml/presentation"
        xmlns:x="http://schemas.microsoft.com/winfx/2006/xaml"
        Title="ToolbarPositionSample" Height="200" Width="300">
	<DockPanel>
		<ToolBarTray DockPanel.Dock="Top">
			<ToolBar>
				<Button Command="Cut" ToolTip="Cut selection to Windows Clipboard.">
					<Image Source="/WpfTutorialSamples;component/Images/cut.png" />
				</Button>
				<Button Command="Copy" ToolTip="Copy selection to Windows Clipboard.">
					<Image Source="/WpfTutorialSamples;component/Images/copy.png" />
				</Button>
				<Button Command="Paste" ToolTip="Paste from Windows Clipboard.">
					<StackPanel Orientation="Horizontal">
						<Image Source="/WpfTutorialSamples;component/Images/paste.png" />
						<TextBlock Margin="3,0,0,0">Paste</TextBlock>
					</StackPanel>
				</Button>
			</ToolBar>
		</ToolBarTray>
		<ToolBarTray DockPanel.Dock="Right" Orientation="Vertical">
			<ToolBar>
				<Button Command="Cut" ToolTip="Cut selection to Windows Clipboard.">
					<Image Source="/WpfTutorialSamples;component/Images/cut.png" />
				</Button>
				<Button Command="Copy" ToolTip="Copy selection to Windows Clipboard.">
					<Image Source="/WpfTutorialSamples;component/Images/copy.png" />
				</Button>
				<Button Command="Paste" ToolTip="Paste from Windows Clipboard.">
					<Image Source="/WpfTutorialSamples;component/Images/paste.png" />
				</Button>
			</ToolBar>
		</ToolBarTray>
		<TextBox AcceptsReturn="True" />
	</DockPanel>
</Window>
这里的技巧在于使用了DockPanel.Dock属性和Orientation属性的组合,前者将工具栏托盘置于应用程序的右侧,后者将工具栏托盘的方向从水平更改为垂直。 这种组合方式使得您可以将工具栏放置在可以想到的几乎任何位置。
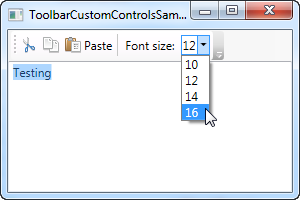
在之前的示例中,我们在工具栏上使用常规的WPF Button控件。这也意味着您可以在工具栏上放置几乎任何其他WPF控件,而无需额外的工作。当然,某些控件在工具栏上的效果比其他控件更好,下拉框和文本等控件通常用于工具栏中,例如旧版本的Microsoft Office中那样。您可以在自己的WPF工具栏上执行相同操作。
此示例中引入的另一件事是分隔符元素,它在两组工具栏项之间创建一个分隔符。 从示例中可以看出,它非常易于使用!
<Window x:Class="WpfTutorialSamples.Common_interface_controls.ToolbarCustomControlsSample"
        xmlns="http://schemas.microsoft.com/winfx/2006/xaml/presentation"
        xmlns:x="http://schemas.microsoft.com/winfx/2006/xaml"
        Title="ToolbarCustomControlsSample" Height="200" Width="300">
	<DockPanel>
		<ToolBarTray DockPanel.Dock="Top">
			<ToolBar>
				<Button Command="Cut" ToolTip="Cut selection to Windows Clipboard.">
					<Image Source="/WpfTutorialSamples;component/Images/cut.png" />
				</Button>
				<Button Command="Copy" ToolTip="Copy selection to Windows Clipboard.">
					<Image Source="/WpfTutorialSamples;component/Images/copy.png" />
				</Button>
				<Button Command="Paste" ToolTip="Paste from Windows Clipboard.">
					<StackPanel Orientation="Horizontal">
						<Image Source="/WpfTutorialSamples;component/Images/paste.png" />
						<TextBlock Margin="3,0,0,0">Paste</TextBlock>
					</StackPanel>
				</Button>
				<Separator />
				<Label>Font size:</Label>
				<ComboBox>
					<ComboBoxItem>10</ComboBoxItem>
					<ComboBoxItem IsSelected="True">12</ComboBoxItem>
					<ComboBoxItem>14</ComboBoxItem>
					<ComboBoxItem>16</ComboBoxItem>
				</ComboBox>
			</ToolBar>
		</ToolBarTray>
		<TextBox AcceptsReturn="True" />
	</DockPanel>
</Window>
工具栏控件使用灵活,在WPF中创建工具栏是非常简单的。您可以做到以前需要第三方工具栏控件才能实现的操作,甚至不需要太多额外工作。