在System.Speech程序集中,微软增加了一些非常酷的东西:语音合成,将文本转换为语音的能力,以及语音识别,将语音识别成文本的能力。 我们将专注于本文中的语音合成,然后在下一章进行语音识别。
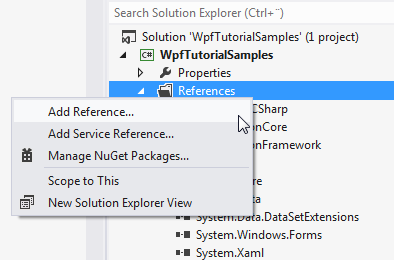
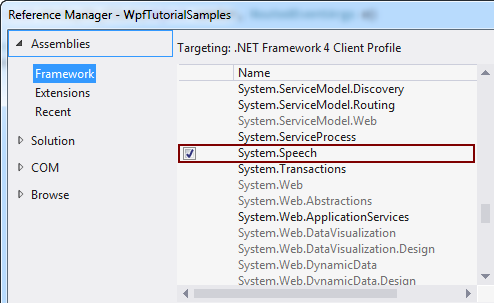
要将文本转换为语音,我们将使用SpeechSynthesizer类。 这个类在System.Speech程序集中,我们需要添加它以在我们的应用程序中使用它。 根据您使用的Visual Studio版本,该过程如下所示:


添加适当的程序集后,我们现在可以使用System.Speech.Synthesis命名空间中的SpeechSynthesizer类。 有了这个,我们将开始另一个非常简单的“Hello,world!” 的例子,这次用语音:
<Window x:Class="WpfTutorialSamples.Audio_and_Video.SpeechSynthesisSample"
        xmlns="http://schemas.microsoft.com/winfx/2006/xaml/presentation"
        xmlns:x="http://schemas.microsoft.com/winfx/2006/xaml"
        Title="SpeechSynthesisSample" Height="150" Width="150">
    <Grid>
        <Button Name="btnSayIt" Click="btnSayHello_Click" VerticalAlignment="Center" HorizontalAlignment="Center">Say hello!</Button>
    </Grid>
</Window>
using System;
using System.Speech.Synthesis;
using System.Windows;
namespace WpfTutorialSamples.Audio_and_Video
{
public partial class SpeechSynthesisSample : Window
{
public SpeechSynthesisSample()
{
InitializeComponent();
}
private void btnSayHello_Click(object sender, RoutedEventArgs e)
{
SpeechSynthesizer speechSynthesizer = new SpeechSynthesizer();
speechSynthesizer.Speak("Hello, world!");
}
}
}
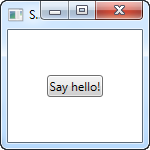
这非常简单,因为屏幕截图在演示语音合成方面确实没什么用,我建议你自己尝试构建这个例子来体验它。
尽管如此,SpeechSynthesizer可以做更多的事情。 通过使用PromptBuilder类,我们可以更好地控制句子的使用方式。 下一个示例是第一个示例的扩展,将说明:
<Window x:Class="WpfTutorialSamples.Audio_and_Video.SpeechSynthesisPromptBuilderSample"
        xmlns="http://schemas.microsoft.com/winfx/2006/xaml/presentation"
        xmlns:x="http://schemas.microsoft.com/winfx/2006/xaml"
        Title="SpeechSynthesisPromptBuilderSample" Height="150" Width="150">
    <Grid>
        <Button Name="btnSayIt" Click="btnSayHello_Click" VerticalAlignment="Center" HorizontalAlignment="Center">Say hello!</Button>
    </Grid>
</Window>
using System;
using System.Speech.Synthesis;
using System.Windows;
namespace WpfTutorialSamples.Audio_and_Video
{
public partial class SpeechSynthesisPromptBuilderSample : Window
{
public SpeechSynthesisPromptBuilderSample()
{
InitializeComponent();
}
private void btnSayHello_Click(object sender, RoutedEventArgs e)
{
PromptBuilder promptBuilder = new PromptBuilder();
promptBuilder.AppendText("Hello world");
PromptStyle promptStyle = new PromptStyle();
promptStyle.Volume = PromptVolume.Soft;
promptStyle.Rate = PromptRate.Slow;
promptBuilder.StartStyle(promptStyle);
promptBuilder.AppendText("and hello to the universe too.");
promptBuilder.EndStyle();
promptBuilder.AppendText("On this day, ");
promptBuilder.AppendTextWithHint(DateTime.Now.ToShortDateString(), SayAs.Date);
promptBuilder.AppendText(", we're gathered here to learn");
promptBuilder.AppendText("all", PromptEmphasis.Strong);
promptBuilder.AppendText("about");
promptBuilder.AppendTextWithHint("WPF", SayAs.SpellOut);
SpeechSynthesizer speechSynthesizer = new SpeechSynthesizer();
speechSynthesizer.Speak(promptBuilder);
}
}
}
这是它变得有趣的地方。 尝试运行该示例,看看它有多好用。 通过为SpeechSynthesizer提供不仅仅是文本字符串的东西,我们可以很好地控制句子的各个部分的说法。 在这种情况下,应用程序将说以下内容:
Hello world and hello to the universe too. On this day, <今天的日期>, we're gathered here to learn all about WPF.
现在尝试将它直接发送到SpeechSynthesizer,你可能会咯咯笑一下结果。 我们所做的是指导Speak()方法如何使用句子的各个部分。 首先我们要求WPF说出“and hello to the universe too” - 以较低的音量和较慢的速度发声,就好像是低声说的那样。
不使用默认发音的下一部分是日期。 我们使用特殊的SayAs枚举来指定日期应该作为实际日期读出,而不是一组数字空格和特殊字符。
我们还要求更强调“all”这个词,使句子更具活力,最后,我们要求拼写出“WPF”这个词,而不是将其作为实际词语发音。
总而言之,这使我们能够更容易理解SpeechSynthesizer!
使您的WPF应用程序说话非常简单,通过使用PromptBuilder类,您甚至可以控制您的单词的使用方式。 这是一个非常强大的功能,但它可能与今天的许多应用程序无关。 虽然它非常酷!